Our team has just completed the 8th sprint in this new and exciting project and we decided to document our journey, sprinkled with challenges, wins and lessons learned.
Over the course of a Friday, Penta’s existing mobile app was handed over to our development team consisting of 10 members, covering multiple skills: development, design, PO and QA.
On Monday morning, the team gathered to make a plan. We decided that our first mission would be to upgrade some of the underlying dependencies - particularly React Native - for several reasons:
- Combing through the code would help the team get familiar with the project
- The existing React Native version lacked some important functionalities
- The version of React used didn’t support Hooks
- Outdated dependencies often pose security risks or other vulnerabilities
Upgrade strategies
To tackle this issue, we had a “divide et impera” strategy. We split into 2 teams, each trying to solve the task in a different way:
- The “in-place” approach - build a new branch inside the project and update all the dependencies.
- The “moving-entire-codebase-in-a-new-project” approach - start a new project and move existing code there; the new project would then hopefully have all the dependencies up to date.
The “in-place” approach
Mihai, who was in the “in-place approach” team, says this method has the following benefits:
- We can recycle code
- We can keep configs
- The approach seems to be less time consuming
- He thought solving the problem this way would definitely elicit some “WOWs” from the rest of the team.
He dared to dream big: what if we could update everything, all at once?
What could go wrong?
As Thomas Edison would put it: we’ve not failed, we’ve just found a way that doesn’t solve the problem.
What this attempt did do was to:
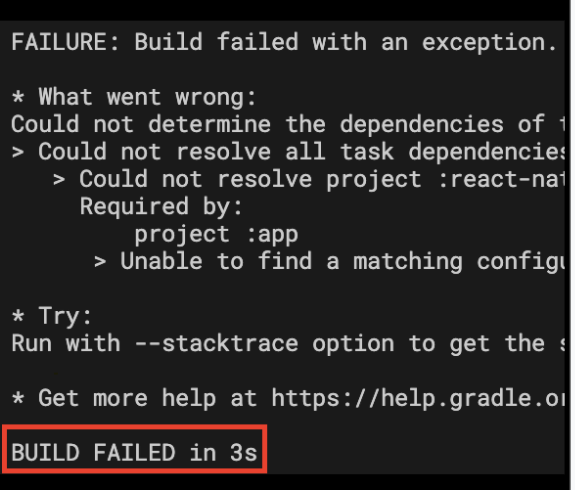
- make an Android build fail in 3 seconds
- prevent the iOS from compiling
- cause all kinds of JS errors after making everything work.
Basically - when the native code wasn’t crashing, the Javascript was crashing. Putting out a fire, immediately ignited another one.
Time for a new strategy.
What about just update a part of the project, and upgrade the rest as Technical Debt items?
What could go wrong?

 A successful native build, errors in Javascript.
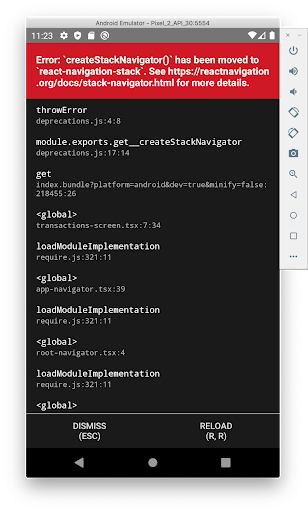
Runtime errors happened - quite a lot of them, especially errors in Firebase and Navigation. We fixed them in the meantime, using guides and changelogs.
Android bits
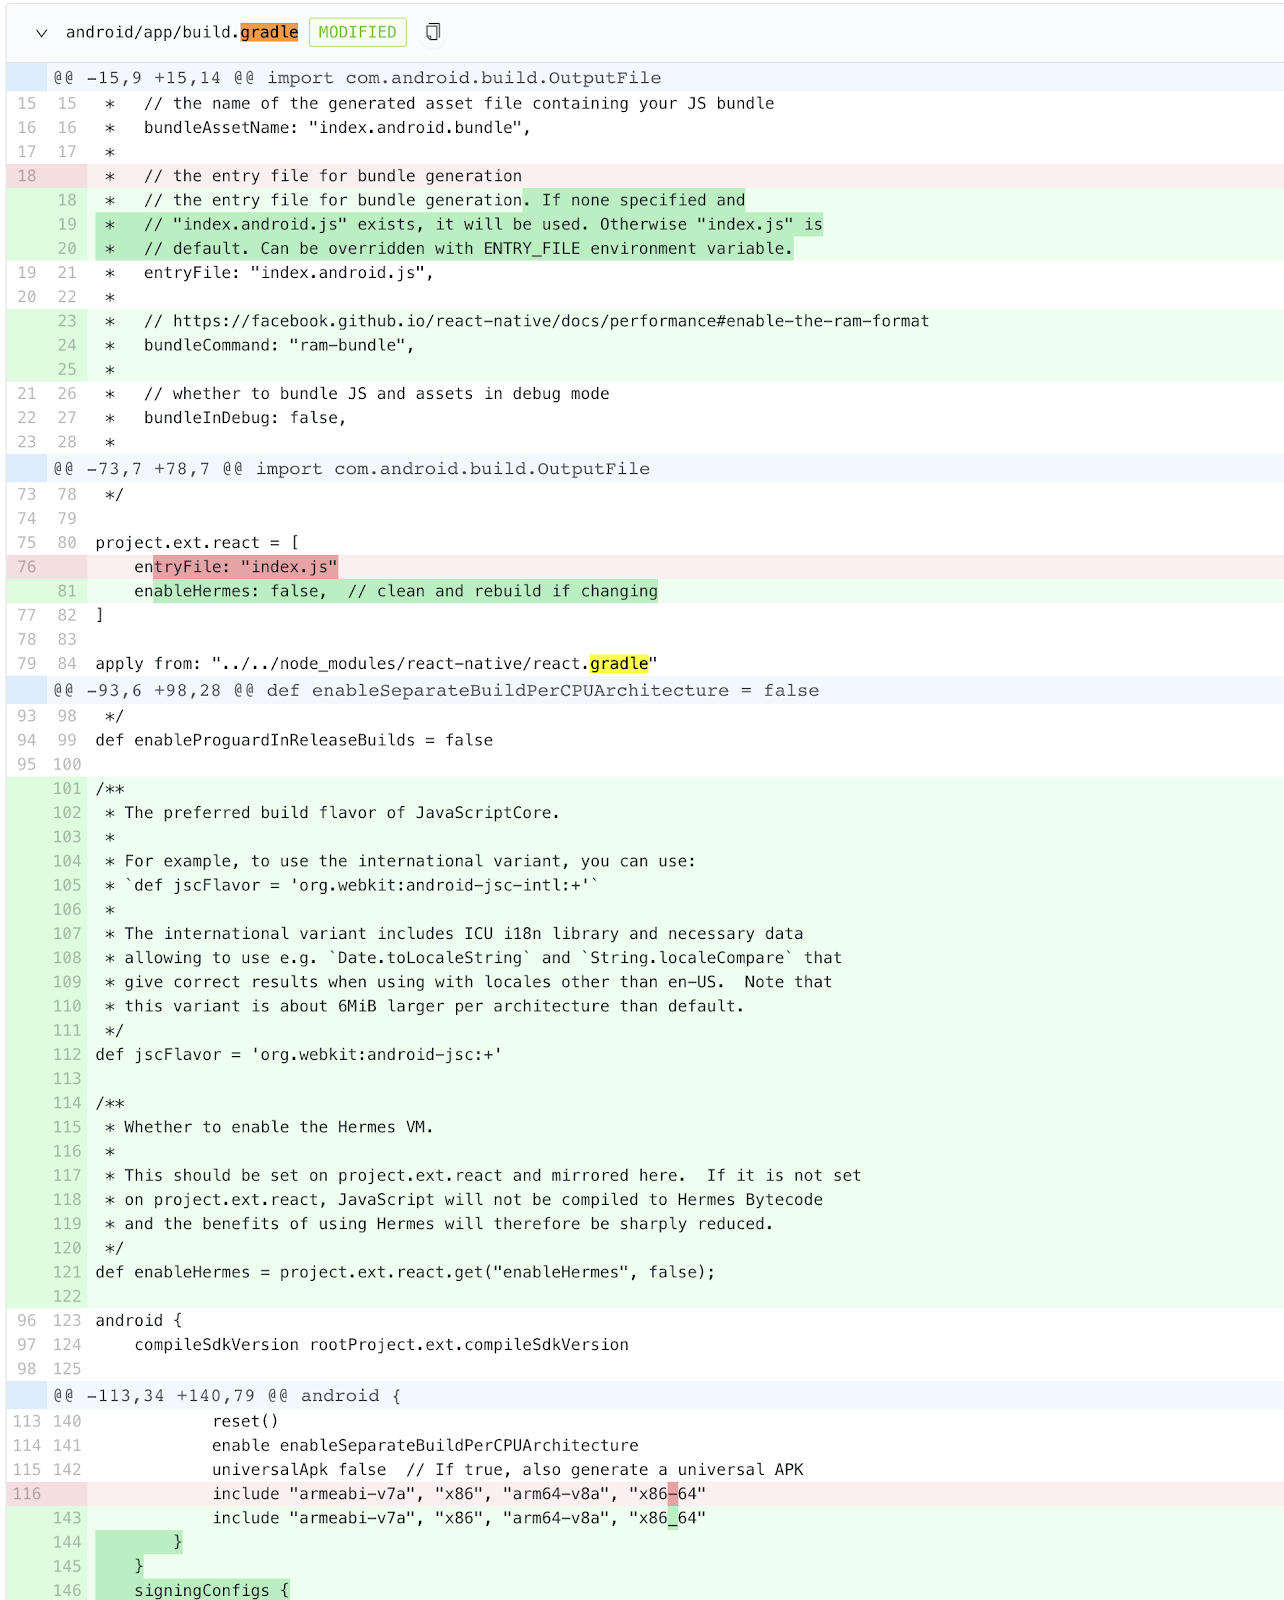
The React Native gods were merciful and gave us the guide for upgrading RN. It’s a tool similar to git diff which shows you all that you need to modify in your base project to upgrade React Native. This significantly increased our speed. We mostly had to upgrade “build.gradle” from the module and the project, “settings.gradle”, and some Java code from the main activity.
Next, for the packages that had breaking changes we used the upgrade guides for the packages and their changelogs in case they were needed.
On the Android, we had to upgrade the packages and let them “auto-link” against the main project.
As expected, lots of “build failed in 3s” appeared because lots of things changed (more than 100 code commits happened) - but with a lot of perseverance, testing and important learnings, we have succeeded:

What were Mihai’s lessons learned while upgrading React Native in a legacy project
- Read the guides
- Read the docs
- Persevere. A lot.
- Test. Test. Test.
iOS bits
Seeing Mihai’s rough but successful journey with Android, Alex’s first thought about his own iOS endeavour was related to delicious slices of sweet baked goods: that it was going to be a piece of cake.
He had it all planned out:
- Update cocoa pods dependencies list
- Run pod install
- Run yarn ios
- Boom! Upgrade done!
He now confesses that until then, he had never seen so many iOS errors in more than 10 years of professional experience of. For example, one weird error expressed by Cocoapods - a dependency manager - stated that one framework was built for MacOS. He couldn’t wrap his mind around these errors and what caused them.
After hours of debugging, Alex finally figured it out: the project was also using binary frameworks, added manually early on, so the compiler was completely thrown off. Getting rid of them only made things worse as more weird errors started to appear.
After more hours of debugging, he came to the conclusion that the project was also using libraries and manually added sub-projects that confused the compiler. Several battles later, the build was successful so he could move on to upgrading the code.
The champagne was pouring.
Next, as any orderly developer would do, Alex started cleaning the code:
- he updated the code to the new API for React Native 0.62
- he tidied up the codebase
- he removed “unused” code: 2 old Objective-C classes that were not used from the iOS project itself.
Fast forward 2 weeks. Our tester, Gabriela, let Alex know that the app was up and running on Android - but on iOS, not so much. He realised that the “unused” files had been, in fact, used by React Native and they were intended as a bridging. An “aha” moment.
Alex’s lessons learned:
- When you use a project which is opinionated about the Package Manager it uses, don’t try to outsmart it by using other methods. Use only one Package Manager system and use it the way that it was intended to be used.
- Don’t delete what you don’t understand, regardless of how harmless or disconnected it may seem. Leave it there until you have the time to understand why it’s there.
The “moving-entire-codebase-in-a-new-project” approach
The steps identified by Lucian were to make a new seed project work, and move the codebase in that project.
He treated these 2 items separately because the team that had previously worked on the project used Ignite to generate it. Lucian encountered issues right from the start - while trying to install Ignite.
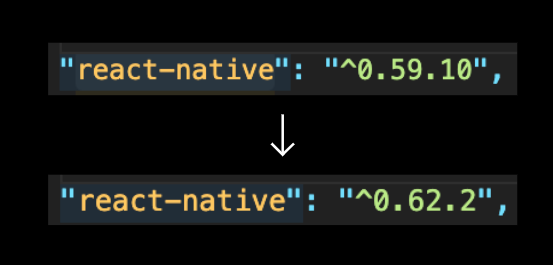
With a bit of help he managed to install it, but quickly ran into another issue - the Ignite framework did not come equipped with the latest version of React Native (version 0.62.2 at the time). It had version 0.61.5.
Using the guide React Native provided, he was able to upgrade to the latest version of React Native. Things then ran pretty smoothly, as there were fewer differences between versions 0.61 and 0.62.
The next step was to import the old codebase. This meant adding almost 600 Typescript and Javascript files to SRC and connecting them to the old start file.
As usually happens, new issues emerged. First up: some dependencies we had in our code were not installed in the new project. Lucian had to look in the code and see what differences there are between the new and the old projects. He extracted which libraries needed to be installed in the new projects. He then encountered some duplicates and some packages that basically performed the same task, so he did a bit of clean-up.
Another issue was that for all these libraries he couldn’t just go ahead and install the latest versions, because some had breaking changes - i18next and react-navigation for example. So if we were to upgrade our code, we estimate that for React Navigation it would have taken a whole extra week.
Some of the changes included receiving configs using React Components, rather than plain Javascript objects. This would have required us to change the entire navigation system of the app, then make a regression. Way too much time.
So we took a step back and decided to use the same version as in the initial project.
Once dependencies were solved, we ran the code again and once again encountered some errors. The one that stood out was that the Firebase version was not compatible with the newest React Native version.
This meant that some of the old dependencies needed to be updated. Also, the new Firebase version has new libraries that replace the old library - which was just a single package - and now has several packages for each functionality.
Here we realized that, even if we were to solve all the issues which have already been fixed by the team working on the 1st approach, we’d get to a point where the code is working but we were a step behind because the iOS and Android parts would still be missing some configs.
There were moments when, hitting an issue with the 1st approach, we managed to find the solution by looking in the project created through the 2nd approach. The sheer fact that we went on both routes proved to be extremely helpful.
TL:DR Conclusions
- If you have outdated dependencies, don’t try to update all at once. Start with a single one, see what breaks, fix and move to the next one
- If you are a larger team (5+ members), try working in parallel to speed things up.
- Use only one Package Manager System and try to use it according to documentation, even if you feel constraints related to the project’s architecture.
- When you are updating a library, look for breaking changes in the docs. Be extra careful. Take intermediate steps.
- Follow the React Native and npm packages upgrade guides.
- Don’t delete what you don’t understand.
- Brace yourself: when you think you’ve finished upgrading, a new version might be already out there. (from the moment we started the project and we publish this article, version 0.63 has been released).
- Keep learning.
This brief insight and the experience gained from previous projects is helping us to successfully advance our partnership with Thinslices and Penta. We’re excited about everything that is yet to come and the common tasks we will face in pursuing the goal of creating the ideal mobile app experience.